One thing that quickly becomes annoying is disruptions to my main home internet. This is annoying for the obvious reasons: I can’t use remote services, home automation that needs the cloud breaks, etc, but is also frustrating because it’s something I largely can’t control.
I’m at the mercy of my ISP to detect outages and resolve them, and sitting around and waiting is one of the worst feelings. After an outage that lasted over a day, I took matters into my own hands and created a backup 4G connection for my home internet.
Disclaimer: This setup is complex and this guide may miss things or omit some details. While I tried to handle everything I did, please know that something may be missing. If you run into trouble, find me on a social media platform on my homepage and I might be able to help or update this guide.
Motivation
What finally threw me over the edge of making this a thing was an outage that my ISP dropped on me one day. My connection had packet loss and was generally unusable for over a day, and they couldn’t really do anything substantial to resolve it before then.
While generally inconvenient, when you work from home ISP outages have a new level of annoying added. They tend to spring up in the middle of on-call shifts or meetings and leave me scrambling to reconnect things to my phone’s hotspot while juggling my other workload.
4G Backup connections (or even an entire backup ISP) isn’t anything new, but being the cheapskape I am I sought to do it with minimal investment and maximum flexibility.
The Hardware
One major factor for my hardware decisions was the fact that I can get free data only SIM cards from my cell phone carrier. These cards just use data from your unlimited data plan, and as long as you use less than 50-100GB per month, there’s no throttling or extra charges. For a backup connection that should see only a few hours of use on average per month, this was a perfect fit.
This also required that I have a device with a physical SIM card slot and be unlocked, so basically limited me to any aftermarket device.
I ended up going with GL-Inet’s GL-X300B industrial gateway. This device had a number of features that drew me to it:
- Open source firmware based on OpenWRT - The entire GL-Inet line of devices runs lightly modified OpenWRT and support vanilla OpenWRT. While the default firmware is fine, you can flash custom firmware without much trouble.
- Metal case that is easy to mount - A lot of devices were plastic clamshells that seemed like they’d work, but metal is better I think. This also would let me replace internal components (like the 4G module) in the future if I wanted to upgrade.
- External antennas - I assumed signal would be bad, so an antenna I can trow up high in room was a big plus. If things get too bad, I can also get an outdoor or directional antenna.
The physical setup is pretty simple with that device too: insert your SIM card and plug the LAN port into your network. I set an IP into new range (more on that later) and disabled DHCP, but left things largely the default.
Network Architecture
To get this to work, I needed to feed the connection into my OPNSense routers (I have a pair of them for redundancy). I already had a similar setup on my Cable ISP, so the final architecture looks like this:
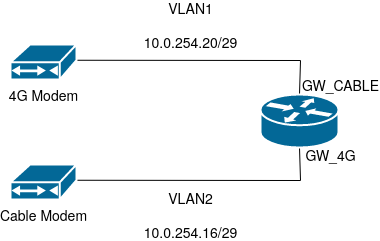
Note that each of the gateways (Cable and 4G) are on their own VLAN, and that VLAN has nothing on it besides the gateway and both of my OPNSense routers (one is shown there for simplicity).
Both of the gateways NAT (see this post for why that is), so these VLANs are just private addressed networks. The OPNSense routers have an interface dedicated to each one (GW_CABLE and GW_4G) and have CARP setup so things fail over in their normal sense.
We’ll get into how OPNSense needs these configured shortly. The important thing is that these are their own Interfaces (important for traffic shaping).
Configuring Gateways
In OPNSense, I added a new interface for my new gateway as outlined above, and configured it with a static IPv4 address. Keep in mind both of those gateways NAT and are in a private address space, so this is fine.
One important setting when setting up the interface is to not select “Block Private Networks”, again, our VLANs exist in private address space so that’s not needed here.
Once the interface is added, we need to add a gateway to each one. This is where we get into some of the odd settings that break from a more simple setup. This configuration is in System > Gateways > Single.
Here’s how I have things setup for my gateways:
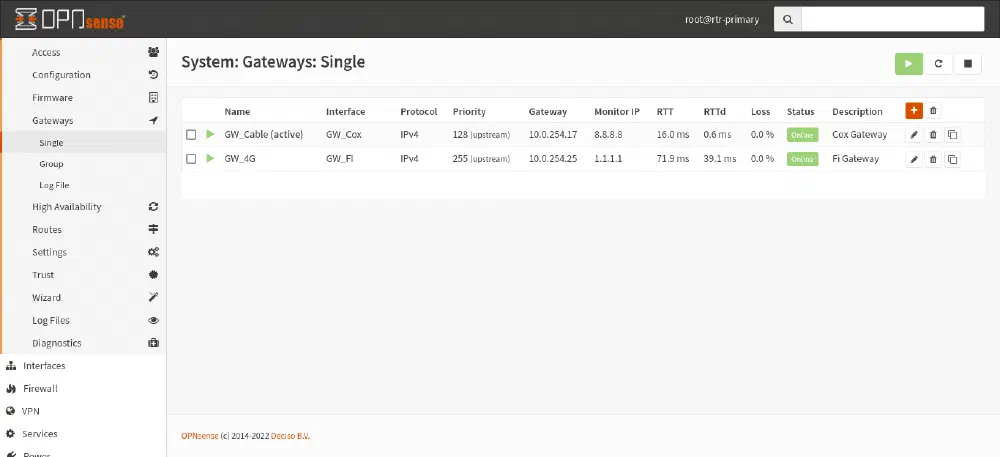
You’ll see I have two gateways configured, and I have to manually configure both. Since our interfaces we’re using for gateways are statically addressed, we need to tell the system that they have a gateway available. I’m not sure if a dynamic gateway obtained via DHCP would work for this (I think it would), but your settings may differ slightly.
For each individual gateway, there’s a number of setting we need to set as well:
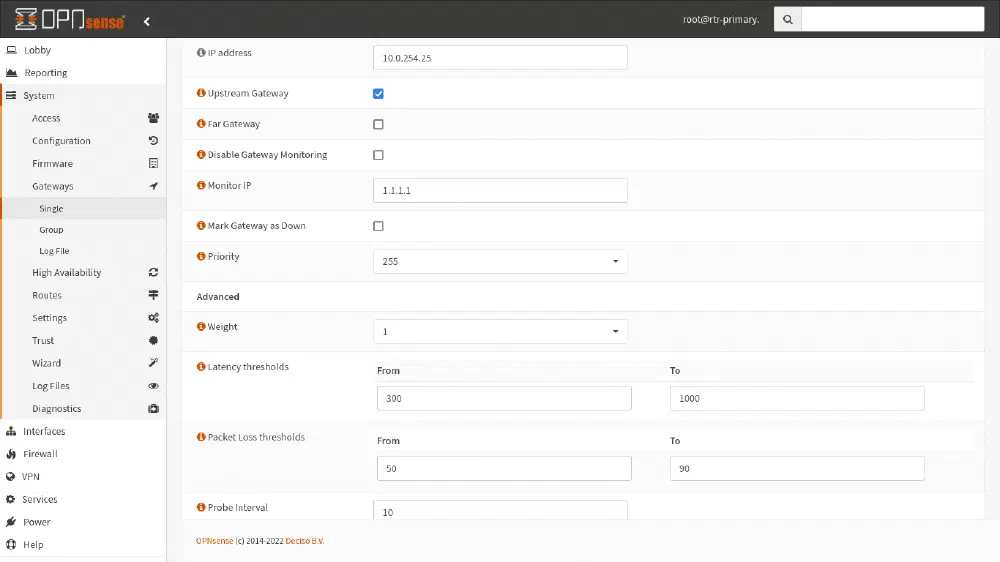
Here are the highlights:
- IP Address - Set this to the address of your gateway device.
- Upstream Gateway - Checked
- Far Gateway / Disable Monitoring - Unchecked
- Monitor IP - Enter something here that’s offsite and reliable. I did Cloudflare DNS
- Priority - Set a low number of your primary and a higher one for your backup connection
- Latency Thresholds / Packet Loss Thresholds - Set these as you like, more info below.
- Probe Interval / Time Period - How frequently the gateway should be pinged and how long should be used for the threshold calculations.
The keys here for failover are the thresholds and intervals. We can configure OPNsense to consider a gateway as down when these values are exceeded, which makes the failover automatic. The time period dictates how long failover will take. Shorter periods are more sensitive but you may flap between connections and cause problems. Longer periods are more stable but may cause some extra failover time. I have 120 seconds set for my period length, which is a happy median.
We’re using an external monitoring IP so OPNSense doesn’t just ping the modem. If the modem is still plugged in and working but the cable connection is cut, the modem would still respond to a ping and OPNSense would consider this gateway up. A better metric is looking at some external device to prove that the entire connection is alive. Keep in mind that this is really the only way OPNSense knows if a connection failed, so if you pick something unreliable it may cause false positives.
Configuring Gateway Groups
We’re not done with our gateways. We’ve added multiple, configured their thresholds for failing over, but now we need to group them so OPNSense can handle failing them over.
In System > Gateways > Groups, add a new Gateway Group and name it what you like (I called mine WANGW). You then will have a list of all the gateways on your system, Add your primary gateway as Tier 1 and your backup one as Tier 2 (you can add more if you have more failover stuff). For “Trigger Level”, select “Member Down” to use the thresholds we defined above.
Going back to the Gateways > Group screen, you should see two green gateways assuming everything is up and your 4G gateway is forwarding traffic.
Configuring NAT
(Skip this section if you don’t have CARP or failover)
Next, we need to tackle NAT or Network Address Translation. In my case, my OPNSense router also performs NAT with my edge gateways (see here), so we need to configure NAT on OPNSense’s end.
This is also complicated by the fact I have many local networks and CARP setup. I opted to just manually generate all my outbound rules, and they look like this:
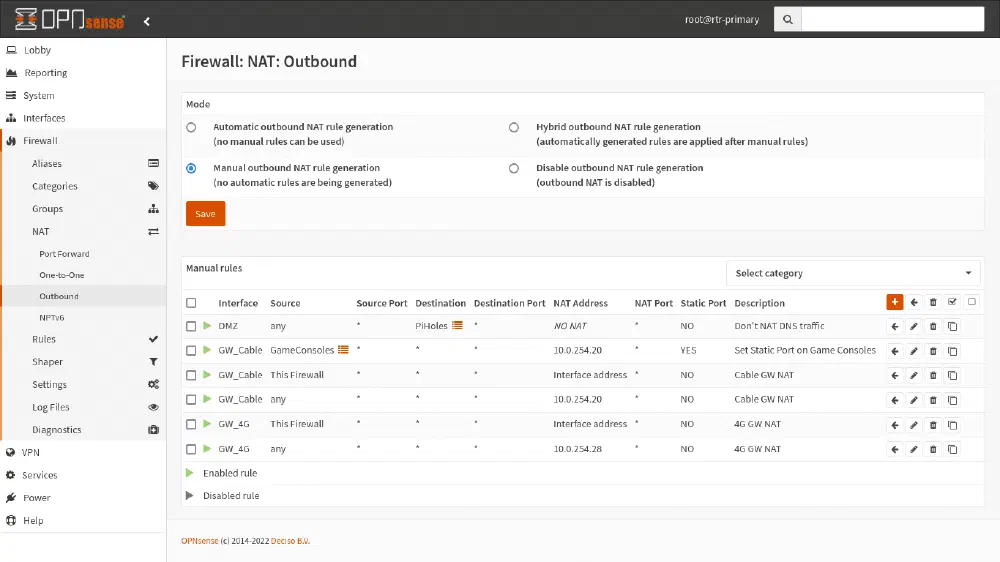
There’s a few extra rules I have setup, but two main rules for each gateway:
- NAT anything from this firewall using the interface address. This is needed so the backup firewall can ping and talk to the gateway device as needed.
- NAT everything else to the CARP address. I have these setup as catchall rules, rather than one per local network, to prevent lots of duplicated effort.
NAT rules are applied in order with the first match winning, so keeping them in the order I show is important.
Configuring Firewall Rules
The last piece of the puzzle is to setup our firewall rules to route traffic using Policy Based Routing. By default, OPNSense sends traffic across using the system’s default gateway, but we don’t want that in this case.
The other complication is that we don’t want to break local traffic, which is easy to do. As an example, LAN1 talking to LAN2. With the default firewall rules, LAN1’s traffic reaches the router, the router has a route for LAN2 via the LAN2 interface, and just sends traffic back out that way. If we add a single rule or just change that default rule, LAN1’s traffic destined to LAN2 will be sent to the gateway. If the gateway doesn’t have a route, it’ll get forwarded to the Internet.
To fix this, we add two rules for each interface (or two floating rules in my case):
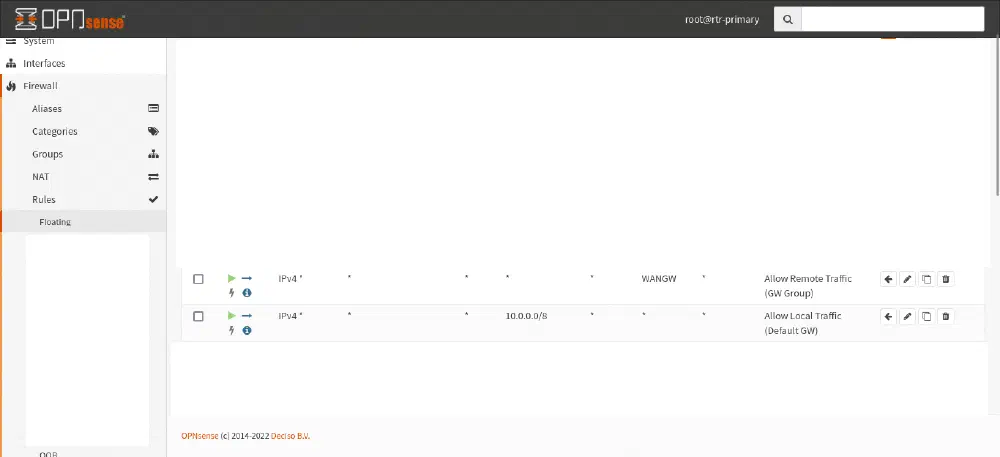
These are configured as “last match” rules, so their order may be backwards if you are using them as first match rules (the default).
The first rule routes all local traffic (my network uses 10.0.0.0/8 for all internal stuff) via the normal default gateway (ie will send the traffic directly to the interface). If that rule doesn’t match, the next rule kicks in which sends all traffic going everywhere to the WANGW group we created before. Since this gateway will failover, this fails our traffic over!
Misc Cleanup Things
Things aren’t perfect yet though. There’s one option that we need to disable: sticky connections.
By default, the router will try and keep TCP traffic on the same gateway as it was on before, even if another gateway is preferred. In the case of failing to our backup gateway, this isn’t a problem. The issue is once service is restored and our main gateway becomes available, traffic will still go over our 4G interface for some time.
I didn’t want this, so I disabled it. In Firewall > Settings > Advanced under Multi-Wan you’ll find the “Sticky Connections” checkbox.
You’ll also probably want to setup Traffic Shaping, but that’s for Part 2.
That’s It!
There’s a lot to unpack here, this setup is complicated but gives us a ton of stuff:
- Redundant Internet
- Redundant Firewalls
- Redundant Gateways
For most failure scenarios, this basically gives us 2N internet, so outages should be a thing of the past.