One thing that’s really handy for your Ubiquiti EdgeRouter is to have it act as a VPN client. This gives all hosts on your network the ability to access the remote VPN without having to login. Setting it up with pfSense is straightforward and pretty easy with the right tools.
Setup pfSense
In our case, we’re using pfSense as the VPN server. Setting up pfSense is
beyond the scope of this particular guide, but there is a handy tool that makes
setup much simpler. In the package manager, install the openvpn-client-export
package. This gives you a handy way to export certificates and configuration
for many VPN clients. In our case, we’ll upload this file to the router in the
next step.
Edit the Config Files
Before we upload the files to the router, there’s a few changes we need to make. Open the OpenVPN config file (ends in .ovpn) and edit the line with pkcs12 and tls-auth to have absolute paths for the certificates. In my case, I put the openvpn files in /config/ovpn, so I changed the lines to look like:
pkcs12 /config/ovpn/filename.p12
tls-auth /config/ovpn/filename.key 1
Optional: Setup automatic password entry
It’s also handy to setup the router to automatically enter the username and password for the VPN connection. This way, it can bring the interface up automatically whenever the router reboots. To do this, add new line to your config file that looks like auth-user-pass /config/ovpn/auth.txt, again subbing in your absolute path for where you plan to place your config files. Then create a new file, auth.txt, with the following content, subbing in your username and password:
vpn-username
vpn-password
Setup the Interface
Copy the files you downloaded to your router. Since the router supports SSH, you can use SCP to transfer the files. I put my files in /config/ovpn, but you can put your files most anywhere.
Login to the CLI of your router and start configuration (run configure). Create the new VPN interface by issuing edit interfaces openvpn vtun0. Set the interface to use the config file you just uploaded by issuing set config-file /path/to/your/config.ovpn.
You can set a name for the interface using set description "Interface Description".
Commit and save your changes (run commit and save).
Setup Routing
Now that the interface is setup, we need to tell our router how we’d like to send traffic over. pfSense sets VPN clients to use an isolated network, so we’ll have to add a static route for all the remote networks we’d like our router to be able to access.
Login to the web interface of the router, and go to the “Routing” tab. Add a new route, setting the remote network and the IP address of the pfSense server’s VPN interface. If you’re not sure of this, connect to the VPN using a computer and use traceroute to get the first hop.
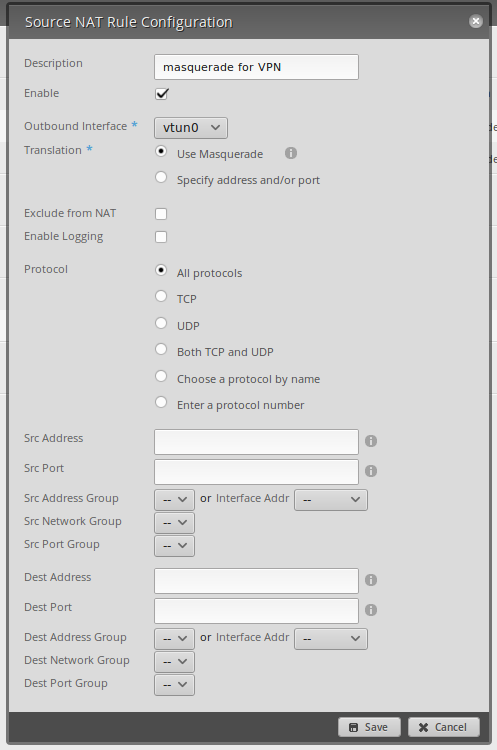
We also need to setup NAT. In theory, you can do this without NAT, but I haven’t bothered setting it up yet. Head over to the “Firewall/NAT” tab, and go to the NAT section. Add a new source NAT rule, and set it to match the image.